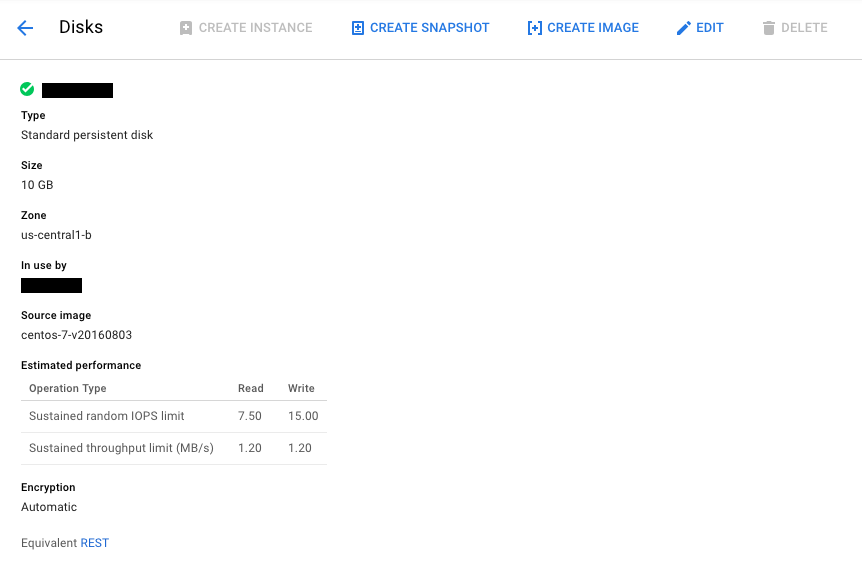
GCP 在開 Compute Engine (GCE)的新機器時,預設的主硬碟(Root Volume)大小是 10GB,一開始可能很夠用,為了節省費用,也不會一次就把硬碟大小設定太大,但隨著時間推移,可能硬碟用量突然增加很多,造成硬碟空間不足的情況,但機器都架好了,要重架、移機也很麻煩,如果是不能關機的線上服務又更棘手。或是額外掛載一顆硬碟上去,分割並製作檔案系統後,再將部份的資料搬移到新的硬碟中,這個方式會需要檔案搬移的時間。還好 GCP 支援動態調整已經掛載正在使用的硬碟大小,而且還不需要停機,再加上 Linux 裡面相關的磁碟分割及檔案系統操作,可以無痛擴充硬碟空間大小。
GCP 的主控台已經將擴充硬碟容量這件事情變得非常方便,首先從 GCP Console - Compute Engine - Disks 找到對應的專案內需要擴充容量的硬碟,可以看到目前的硬碟大小為 10GB,進入右上方的編輯(Edit),即可直接調整硬碟大小(最大 64TB),完成後按下下方藍色儲存(Save)按鈕,就完成了硬碟容量的擴充。

不過需要注意一些事情:
- 由於 GCP 上開機硬碟使用 MBR 開機,本身有 2TB 的上限,開機硬碟擴充容量時不能超過 2TB 的限制
- 擴充硬碟是不可反悔的,因此只能擴大,不能縮小硬碟大小
如果是習慣用 gcloud 指令,也可以透過指令完成一樣的操作:
# gcloud compute disks resize [DISK_NAME] --size [DISK_SIZE]
例如將 instance-1 硬碟擴增為 20GB:
# gcloud compute disks resize instance-1 --size 20GB

This command increases disk size. This change is not reversible.
For more information, see:
https://cloud.google.com/sdk/gcloud/reference/compute/disks/resize

Do you want to continue (Y/n)?  y

Updated [https://www.googleapis.com/compute/v1/projects/project-1/zones/asia-east1-b/disks/instance-1].
就這麼簡單!(才怪)
從 df 指令可以看到目前硬碟的分割區及掛載情況,其中 /dev/sda1 分割區掛載為 Linux 作業系統的 root。
# df -h

Filesystem      Size  Used Avail Use% Mounted on
/dev/sda1        10G   10G   35M 100% /
會發現明明已經在 GCP Console 中把硬碟調整為 20GB,怎麼還是只有 10GB 可以用!?因為上個步驟其實只調整了硬碟大小,還沒分配多出來的新容量,因此需要透過磁碟分割相關的指令,將原本的分割區擴大。
首先透過 lsblk 指令列出所有硬碟及分割區
# lsblk

NAME   MAJ:MIN RM SIZE RO TYPE MOUNTPOINT
sda      8:0    0  20G  0 disk
└─sda1   8:1    0  10G  0 part /
再透過 growpart 指令擴大分割區,用法為
# growpart /dev/[DISK_ID] [PARTITION_NUMBER]
像是這次我們要把 /dev/sda 的硬碟(TYPE: disk)的第一個分割區(TYPE: part)擴大,指令即為
# growpart /dev/sda 1

CHANGED: partition=1 start=2048 old: size=20969472 end=20971520 new: size=41927602,end=41929650
這樣就好了嗎?(天真)
最後一個步驟,就是擴大作業系統的檔案系統,這邊就要根據不同的檔案系統,進行不同的操作。如果是 ext2、ext3、ext4 這些檔案系統,可以使用 resize2fs:
# resize2fs /dev/[DISK_ID][PARTITION_NUMBER]
在這個範例中會是
# resize2fs /dev/sda1
如果是 xfs,則是使用 xfs_growfs 指令:
# xfs_growfs /dev/[DISK_ID][PARTITION_NUMBER]
這邊就會改為
# xfs_growfs /dev/sda1

meta-data=/dev/sda1              isize=256    agcount=4, agsize=655296 blks
         =                       sectsz=4096  attr=2, projid32bit=1
         =                       crc=0        finobt=0
data     =                       bsize=4096   blocks=2621184, imaxpct=25
         =                       sunit=0      swidth=0 blks
naming   =version 2              bsize=4096   ascii-ci=0 ftype=0
log      =internal               bsize=4096   blocks=2560, version=2
         =                       sectsz=4096  sunit=1 blks, lazy-count=1
realtime =none                   extsz=4096   blocks=0, rtextents=0
data blocks changed from 2621184 to 5240950
最後再用 df 指令確認硬碟空間是否有增加
# df -h

Filesystem      Size  Used Avail Use% Mounted on
/dev/sda1        20G   10G   11G  50% /
分割區大小顯示為 20GB,這樣就大功告成囉!而且不需要關機,想增加就增加,超級方便!
Reference
Appendix
如果在 growpart 的時候出現下面的錯誤,其實設定已經完成,只是必須要重新開機才能生效,重新開機後就可以看到硬碟容量已經完成擴充。
attempt to resize /dev/sda failed. sfdisk output below:
| sfdisk: Warning: no primary partition is marked bootable (active)
| This does not matter for LILO, but the DOS MBR will not boot this disk.
|
| Disk /dev/sda: 819200 cylinders, 4 heads, 32 sectors/track
| Old situation:
| Units: cylinders of 65536 bytes, blocks of 1024 bytes, counting from 0
|
|    Device Boot Start     End   #cyls    #blocks   Id  System
| /dev/sda1         32  327679  327648   20969472   83  Linux
| /dev/sda2          0       -       0          0    0  Empty
| /dev/sda3          0       -       0          0    0  Empty
| /dev/sda4          0       -       0          0    0  Empty
| New situation:
| Units: sectors of 512 bytes, counting from 0
|
|    Device Boot    Start       End   #sectors  Id  System
| /dev/sda1          4096 104857599  104853504  83  Linux
| /dev/sda2             0         -          0   0  Empty
| /dev/sda3             0         -          0   0  Empty
| /dev/sda4             0         -          0   0  Empty
| Successfully wrote the new partition table
|
| sfdisk: BLKRRPART: Device or resource busy
| sfdisk: The command to re-read the partition table failed.
| Run partprobe(8), kpartx(8) or reboot your system now,
| before using mkfs
| sfdisk: If you created or changed a DOS partition, /dev/foo7, say, then use dd(1)
| to zero the first 512 bytes:  dd if=/dev/zero of=/dev/foo7 bs=512 count=1
| (See fdisk(8).)
| Re-reading the partition table ...
FAILED: failed to resize
***** WARNING: Resize failed, attempting to revert ******
Re-reading the partition table ...
sfdisk: BLKRRPART: Device or resource busy
sfdisk: The command to re-read the partition table failed.
Run partprobe(8), kpartx(8) or reboot your system now,
before using mkfs
***** Appears to have gone OK ****
Cover photo credit: https://unsplash.com/photos/wloRJGS6Y34